
Easter is just around the corner and what better way to join in the celebration than with some baking! We’ve put together some of our favourite recipes we’ve found to help you get inspired and join in the fun with your little one over the Easter break. So put on an apron, roll up your sleeves and wash your hands, and get ready to join in some baking fun!
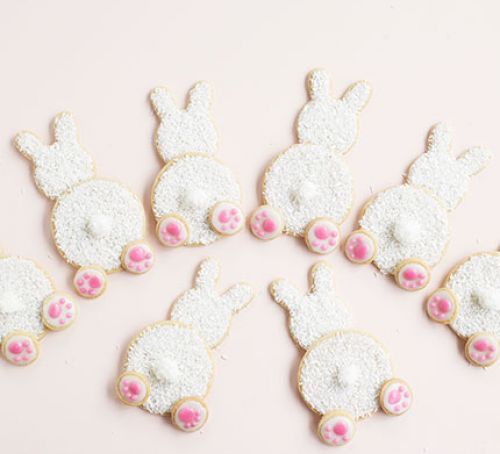
WHITE RABBIT BISCUITS
Ingredients
- 200g unsalted butter, at room temperature
- 400g plain flour
- 280g caster sugar
- 1 egg
- ¼ tsp vanilla extract
- a pinch of salt
- ½ tsp cream of tartar
- 600g icing sugar
- 170g pack of desiccated coconut
- pink food colouring gel
- 15 mini marshmallows
You will also need:
- 1 x rabbit head-shaped cookie cutter
- 1 x 7cm round cookie cutter
- 1 x 3cm round cookie cutter
Method
- Heat oven to 180C/160C fan/. Lightly rub the butter and flour together with your fingertips until the mixture looks like fresh breadcrumbs.
- Mix the sugar and egg together in another in a bowl with a whisk and when it is really well combined and runny add it to the flour mixture.
- Add all the other ingredients and squish it together with your hands, keep working the dough until it’s smooth, soft and comes together in one piece.
- Roll the dough out on a lightly floured surface with a rolling pin until it is about half a centimetre thick. Cut into shapes. We did 15 rabbit heads, 15 large circles and 30 mini circles.
- Place your biscuits on baking sheets lined with baking paper and bake in batches for about 15 mins (or until they are lightly golden at the edges).
- Let them cool in the tin for a few minutes before carefully transferring them to a wire rack to cool completely and become crisp.
- While the biscuits cool mix enough cold water with the icing sugar to create a thick icing. Place a quarter of the icing in another bowl and add a very small amout of pink gel food colouring. Transfer both the white icing and the pink icing into disposable piping bags and snip off the end to make a very small nozzle on the pink icing and a wider one on the white icing.
- Pipe white icing over the small round biscuits and leave to dry. Then pipe white icing to cover all of the large circular biscuits and the rabbit biscuits (be fairly sparing and spread it out with the back of a spoon – it doesn’t have to be neat on these ones). Once you’ve iced each one sprinkle generously with dessicated coconut before the icing dries.
- Take the pink icing and use to create paws on the smaller circles then stick 2 of them onto each of the large circles using icing like glue. With the icing you have left, coat the marshmallows and cover those in coconut too before sticking them onto the middle of the larger circles to create a fluffy tail. Leave to set completely for about 15-20 mins then serve.
Recipe by Miriam Nice at http://www.bbcgoodfood.com/recipes/white-rabbit-biscuits (March 2016)
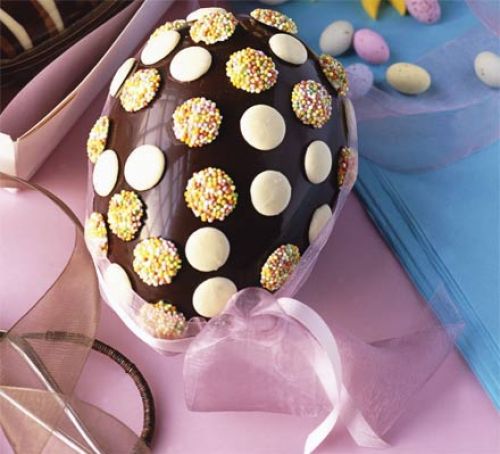
Chocolate Button Egg
Ingredients
For the egg
- 200g good-quality dark chocolate, plus a little extra for decorating
To decorate
- 25g bag chocolate button
- 25g bag white chocolate button, with speckles
- ribbon, approx 50 cm long
Special equipment
- 2 chocolate egg moulds
- clean flat pastry brush or small paintbrush
Method
-
Break the chocolate into pieces and gently melt in a heatproof bowl over a pan of simmering water, making sure the bowl doesn’t touch the water. Stir until smooth, then take off the heat and leave until cool, but still runny. Spoon a quarter of the chocolate into one of the egg moulds and spread thickly over the inside with a flat pastry brush or paintbrush. Be sure to cover the sides well, as this makes it easier to join the edges. Check that the chocolate is even by holding the mould up to the light. Repeat with the other mould. Leave in a cool place to set, then chill for 5 mins. TIP: Putting the egg halves in the fridge once the chocolate has set makes it easier to add another layer of warm chocolate. Don’t be tempted to leave the moulds in the fridge any longer than necessary as condensation could cause the chocolate to discolour.
- Re-warm the remaining chocolate and repeat the process for each side of the mould, saving about 1 tbsp of chocolate for later. Use a knife to scrape away any excess around the rim of the mould to give a clean, straight edge. Turn out each half onto a sheet of greaseproof paper, carefully pulling away the mould until it releases itself.
- Place one half of the egg on its back (you can create a nest of scrunched greaseproof paper to stop it from rolling about). Warm the reserved chocolate and brush around the edge of the egg. Place the other half on top and press together. You can seal the join further by brushing with a little more chocolate and filling in any jagged edges or holes. Leave in a cool place to set firm.
-
To decorate, use the paintbrush to dab a little chocolate on the backs of the chocolate buttons. Gently press them onto the egg. For the finishing touch, tie the ribbon around the middle to hide the join
Recipe by BBCGoodFood at http://www.bbcgoodfood.com/recipes/5808/simple-chocolate-button-egg (April 2008)